

Appearance
Creating A New Space
In FluentCommunity, Spaces are the foundational building blocks of your community. Think of them as individual groups, forums, or hubs where members can gather to discuss a specific topic. You can create as many Spaces as you need.
Use Case: You could create a "General Discussion" space for all members, a private "Beta Testers" space for product feedback, and another "Beginner's Guide" space for new users to ask questions.
How to Create a Space
You can create a new space directly from the front-end of your community portal.
- From the main community header, click on the Spaces tab.
- On the "All Spaces" page, click the New Space button in the top-right corner.
This will launch the space creation wizard.
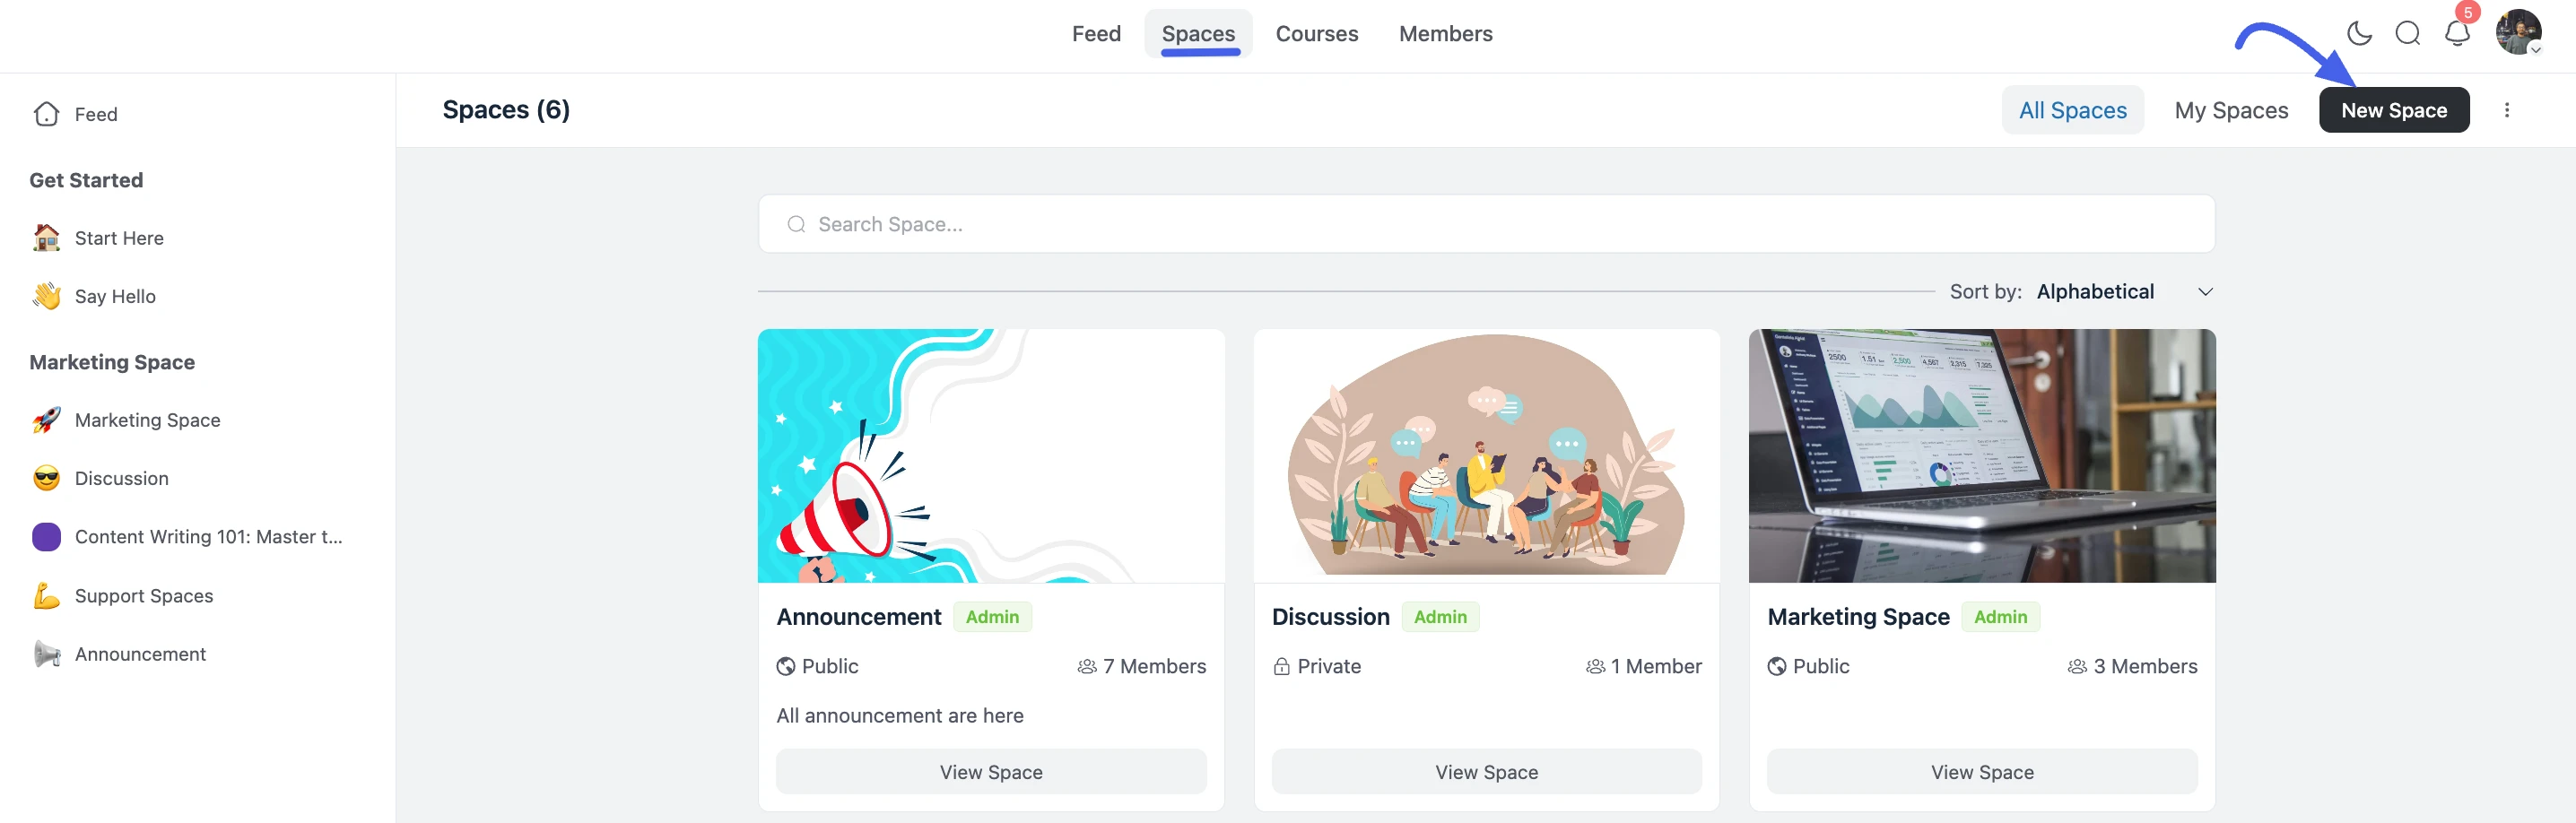
Step 1: Choose a Space Type
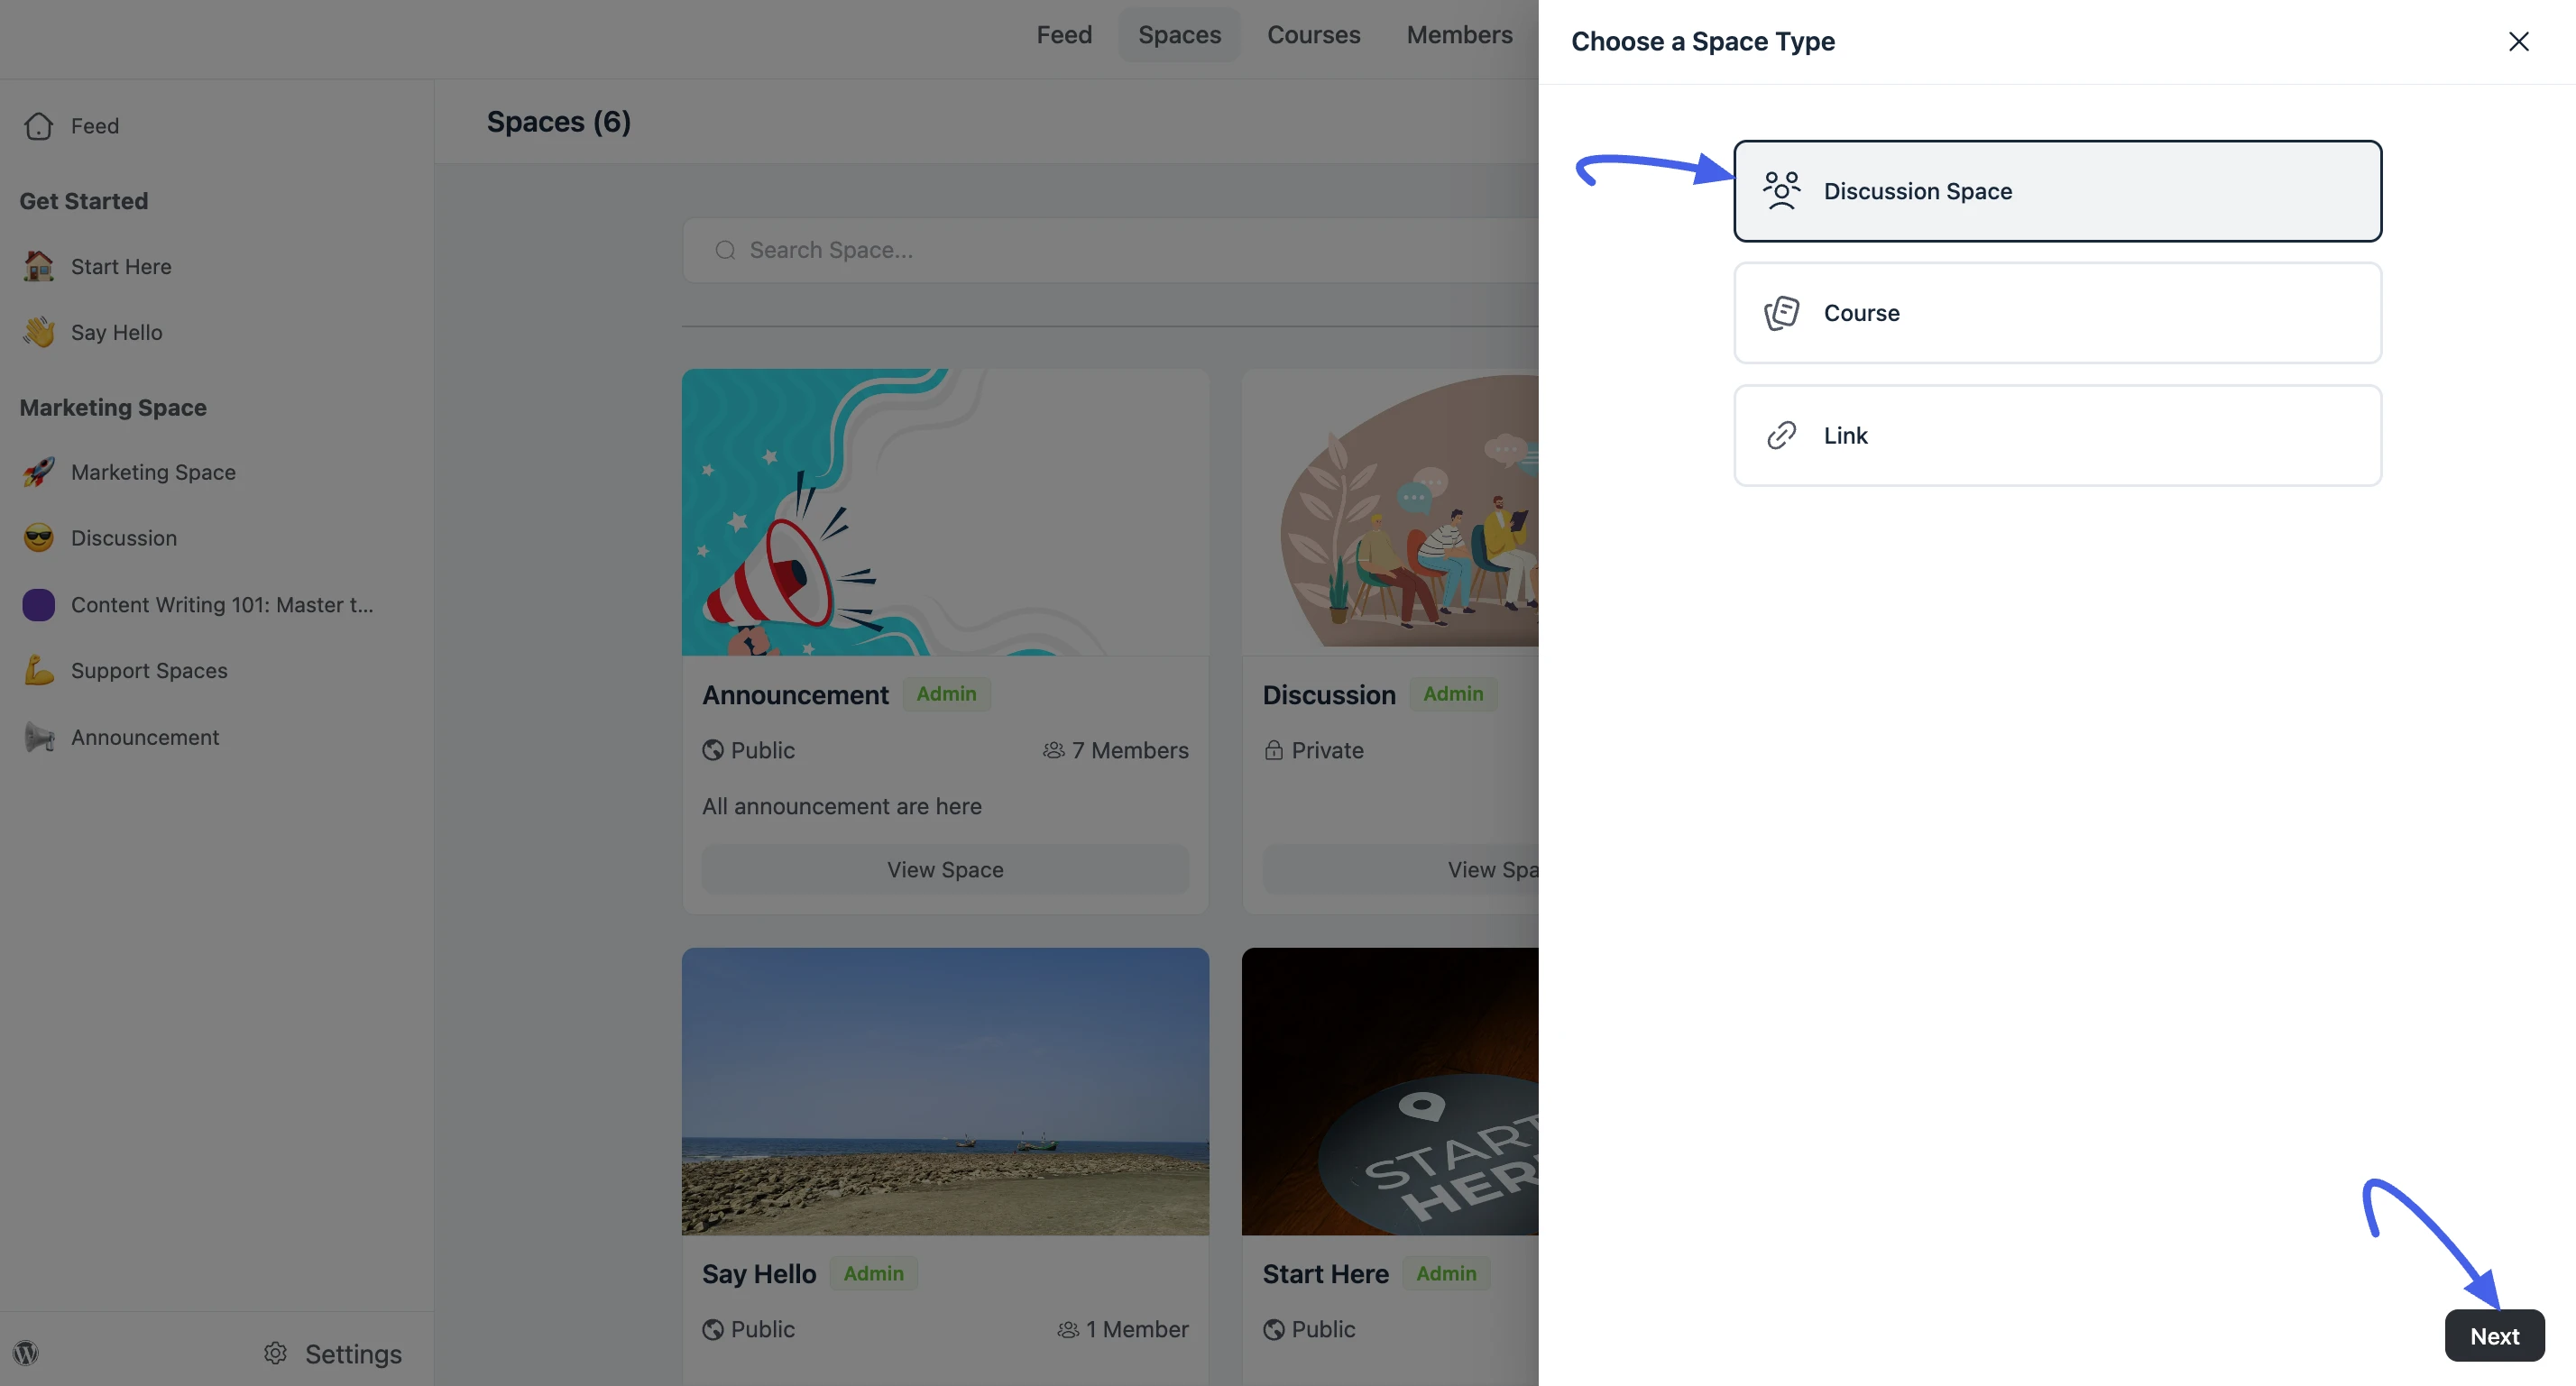
The first step is to choose what kind of space you want to create. A popup will appear.
- Discussion Space: This is the standard and most common space type, perfect for discussions, questions, and sharing content.
- Course: This creates a dedicated space for a FluentCommunity course.
- Link (Pro): This Pro feature allows you to create a space that links directly to an external URL.
For this guide, we will select Discussion Space and click Next.
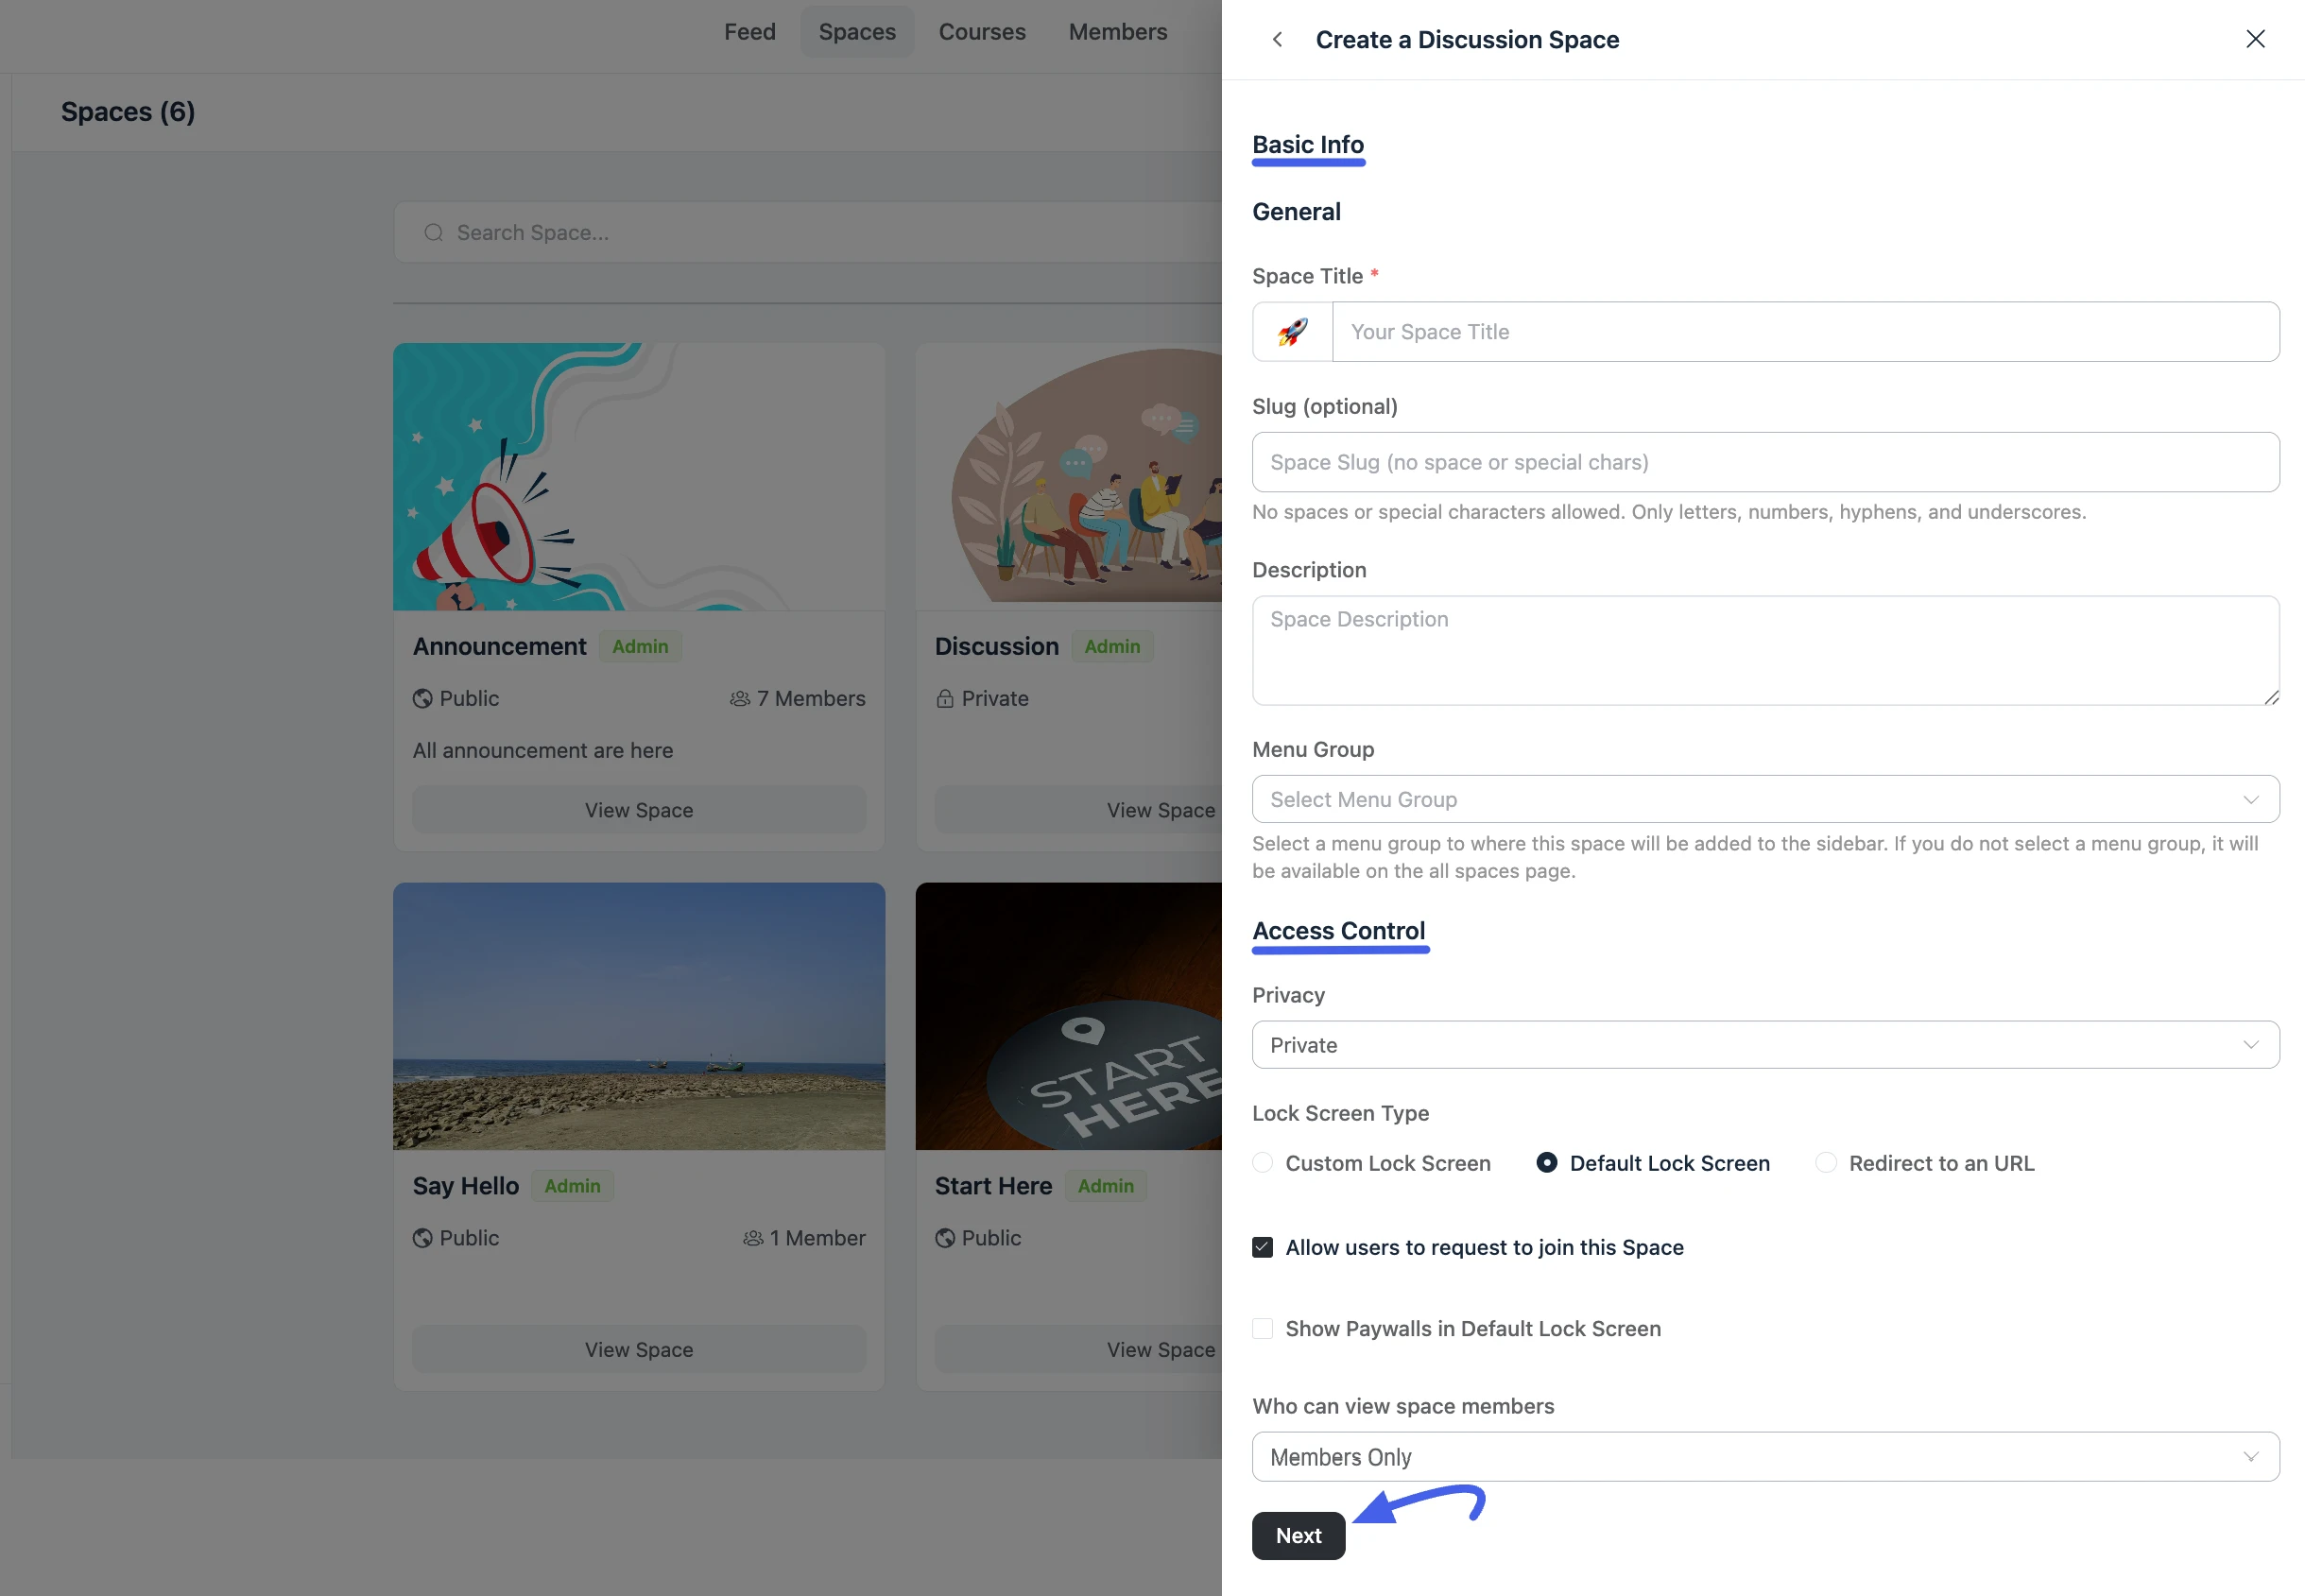
Step 2: Basic Info & Access Control
This is where you'll set up the core identity and privacy for your new space.
Basic Info
- Space Title: Enter a clear and descriptive name (e.g., "General Space"). You can also click the rocket icon to choose an emoji or icon for your space.
- Slug (optional): This is the URL-friendly version of your title. It's usually created automatically, but you can set a custom one here (e.g.,
general-space). - Description: Add a short description that explains the purpose of the Space. This helps members decide whether to join.
- Menu Group: This is a key navigation feature. You can select a "Space Group" (which you create in Space Groups) to add a direct link to this space in the main left sidebar of your community.
Access Control
This is a crucial step for controlling your space's privacy.
- Privacy: Choose who can see and join this Space.
- Public: Anyone can see the space, its members, and its posts. You can also check "Allow users to request to join this Space" if you want to approve members first.
- Private: The space is listed in the directory, but only members can see the content. When you select "Private," a new "Lock Screen Type" option appears:
- Custom Lock Screen: This lets you create a custom message or design for what non-members see when they land on this space.
- Default Lock Screen: This will show a standard, default message that the space is private.
- Redirect to a URL: Redirects non-members to a different page entirely (like a sales or landing page).
- Secret: The space is completely hidden and invisible to non-members. It can only be accessed via a direct link by members who have been invited.
- Show Paywalls in Default Lock Screen: When using the Default Lock Screen, check this to display any configured paywall content to non-members.
- Allow users to request to join this Space: When enabled, non-members can submit a join request. Admins and Moderators approve or reject requests from the Space's Members tab.
- Who can view space members: Controls who can see the member list for this Space. Options: Member Only, Admin/Moderator Only, Any Logged-in User, or Anyone.
Once you have configured these settings, click Next.
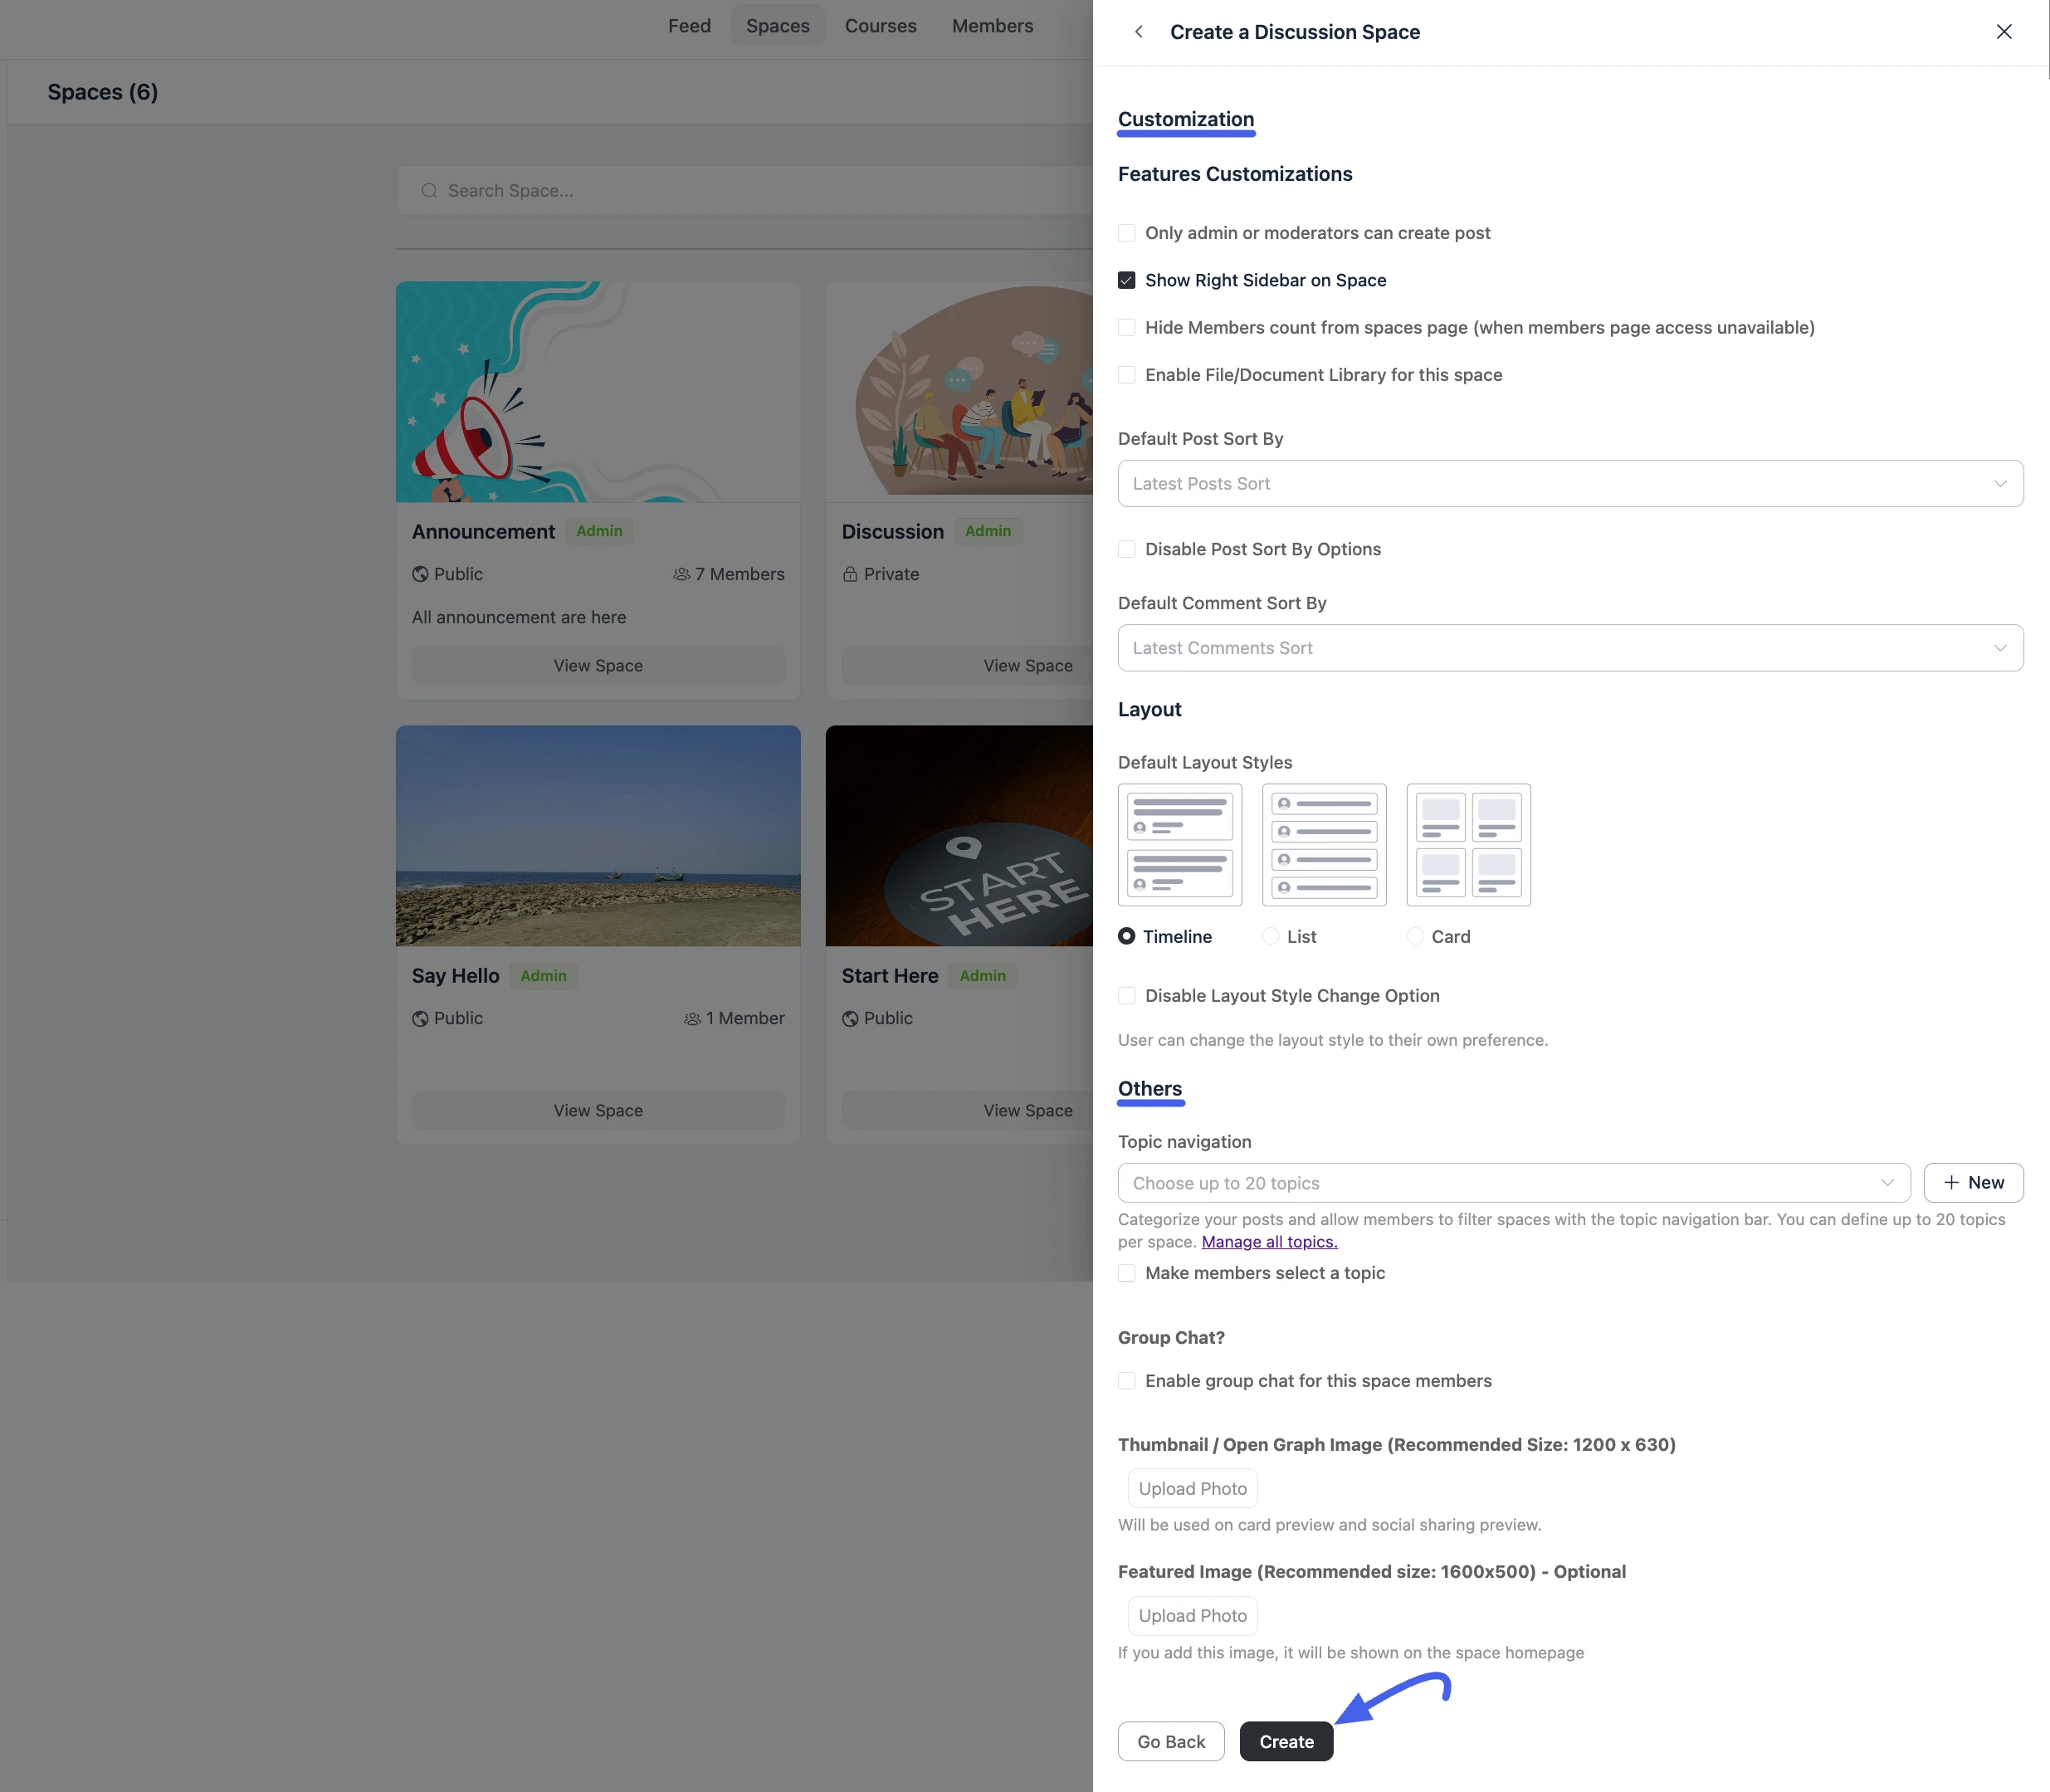
Step 3: Customization
This final step controls the look, features, and content organization of your new Space.
Features Customizations
- Only admin or moderators can create post: Turns the Space into an announcement-style area where regular members can read and comment, but cannot create new posts.
- Show Right Sidebar on Space: Enabled by default. Displays the "About" and "Recent Activities" widgets inside the Space.
- Hide Members count from spaces page (when members page access unavailable): Hides the member count from the All Spaces directory for users who do not have access to the Space members list.
- Enable File/Document Library for this space: Adds a dedicated Files tab to the Space where members can upload and share documents.
Default Post Sort By
- Choose how posts are ordered by default when members first load the Space (e.g., Latest Posts Sort).
- Disable Post Sort By Options: Locks the sort order you've chosen so members cannot change it themselves.
Default Comment Sort By
- Choose how comments are ordered by default within posts (e.g., Latest Comments Sort).
Layout
- Default Layout Styles: Choose how posts are displayed in this Space. Three options are available:
- Timeline: A standard chronological feed.
- List: A compact, text-focused list view.
- Card: A grid of visual cards, ideal for image-heavy content.
- Disable Layout Style Change Option: Check this to prevent members from switching the layout to their own preference.
Others
- Topic navigation: Categorize posts within your Space. Select up to 20 topics from the dropdown. Members can then filter the Space feed by topic.
- Click + New to create a topic directly from this window.
- Click Manage all topics to go to the full topic management page, where you can drag and drop topics into the order you want them to appear in the filter dropdown.
- Make members select a topic: Requires members to choose a topic before creating a new post in this Space.
Group Chat
- Enable group chat for this space members: Creates a dedicated real-time group chat room for all members of this Space.
Images
- Thumbnail / Open Graph Image (Recommended Size: 1200×630): Used on the All Spaces card preview and when the Space URL is shared on social media.
- Featured Image (Recommended size: 1600×500) Optional: Shown as a banner at the top of the Space homepage.
Step 4: You're Done!
Click the Create button.
You will be taken directly to your new, fully configured space, ready for its first post!